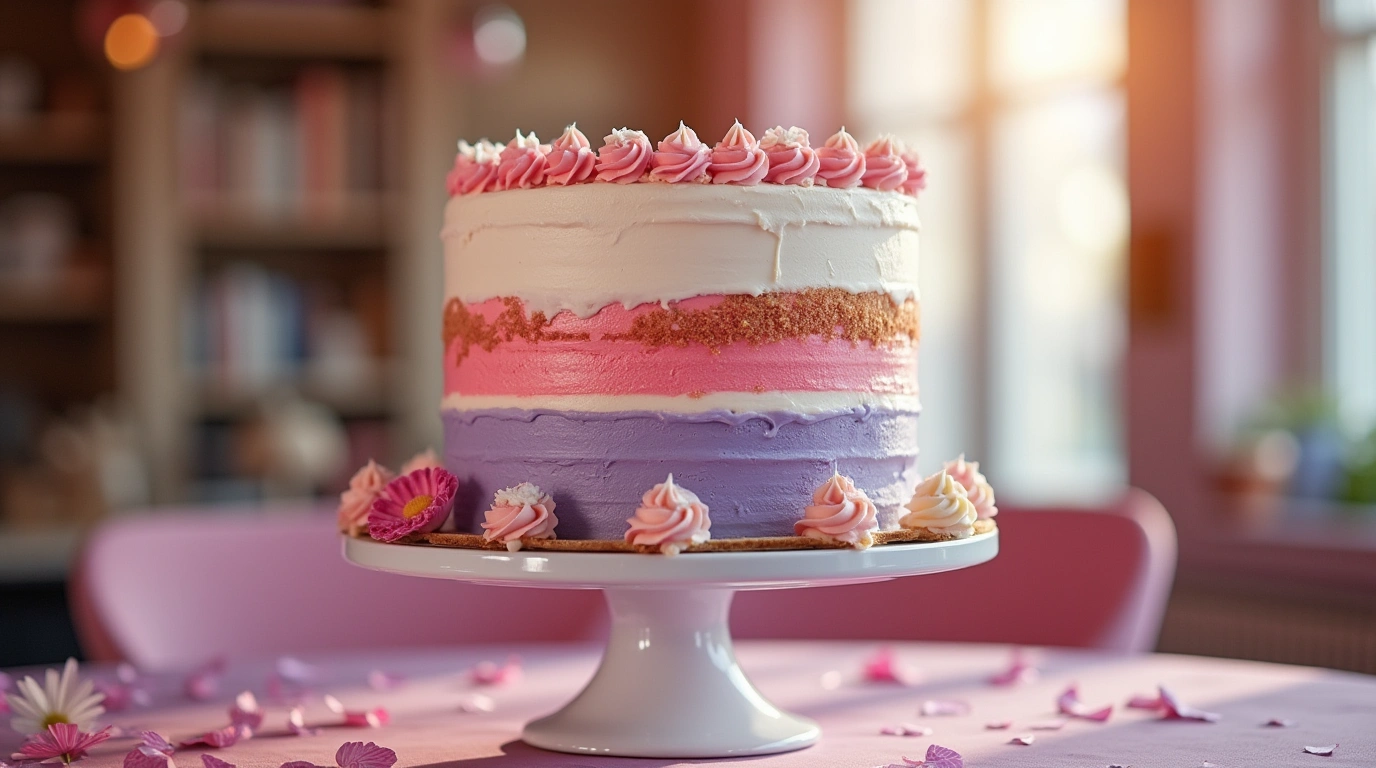
f you’re looking for a dessert that brings a touch of magic to any celebration, the princess cake is the perfect choice! Elegant, versatile, and absolutely delicious, this showstopper dessert will wow your guests and add a festive vibe to any occasion. Whether you’re hosting a birthday party, a themed gathering, or simply want to indulge in something sweet and special, this cake has it all. Imagine light, fluffy layers of cake, smooth buttercream filling, and a beautiful fondant coating that adds both flavor and charm. With its stunning appearance and delightful taste, the princess cake is sure to become your go-to recipe for creating unforgettable moments. Ready to add some magic to your next celebration? Let’s dive into this simple yet magnificent recipe!
Table of Contents
Key Benefits of Making a Princess Cake
Making a princess cake is not just about creating a beautiful dessert; it’s about bringing a touch of magic and joy to any occasion. Whether you’re an experienced baker or a beginner, this cake is surprisingly easy to prepare, and the results are always stunning. Here’s why you should consider baking a princess cake for your next celebration:
- Elegant and Festive: The princess cake is the perfect showstopper for any event. Its smooth fondant exterior and vibrant colors make it a standout centerpiece at birthday parties, tea times, and themed celebrations. This cake is ideal for anyone looking to add a touch of elegance to their table.
- Versatile for Any Occasion: Whether you’re celebrating a special birthday, a baby shower, or a simple family gathering, the princess cake fits every occasion. With a variety of fillings and toppings, you can easily customize the flavor to suit your theme or personal taste. Add raspberry jam for a fruity twist or keep it classic with vanilla buttercream. The possibilities are endless!
- Fun to Make and Decorate: One of the most exciting aspects of making a princess cake is decorating it. The layers, filled with rich cream and adorned with fondant, create a magical experience that will make you feel like a true cake artist. Plus, kids and guests alike will be in awe of your culinary creation!
- Perfect for Creating Memories: Baking a princess cake isn’t just about the end result—it’s about the joy and satisfaction of crafting something beautiful from scratch. It’s a cake that invites conversation and creates lasting memories with friends and family, turning every celebration into something extra special.
- Crowd-Pleasing: When it comes to flavor, the princess cake is a winner. The balance between the soft, fluffy layers, sweet buttercream filling, and delicate fondant ensures every bite is a delightful experience. It’s the kind of dessert that pleases both kids and adults, making it the perfect treat for large gatherings or intimate celebrations.
By now, you can see that the princess cake isn’t just any dessert—it’s a magical, versatile, and fun treat that will make any event unforgettable. Ready to start baking? Let’s gather the ingredients and bring this gorgeous cake to life!
Ingredients for Your Princess Cake
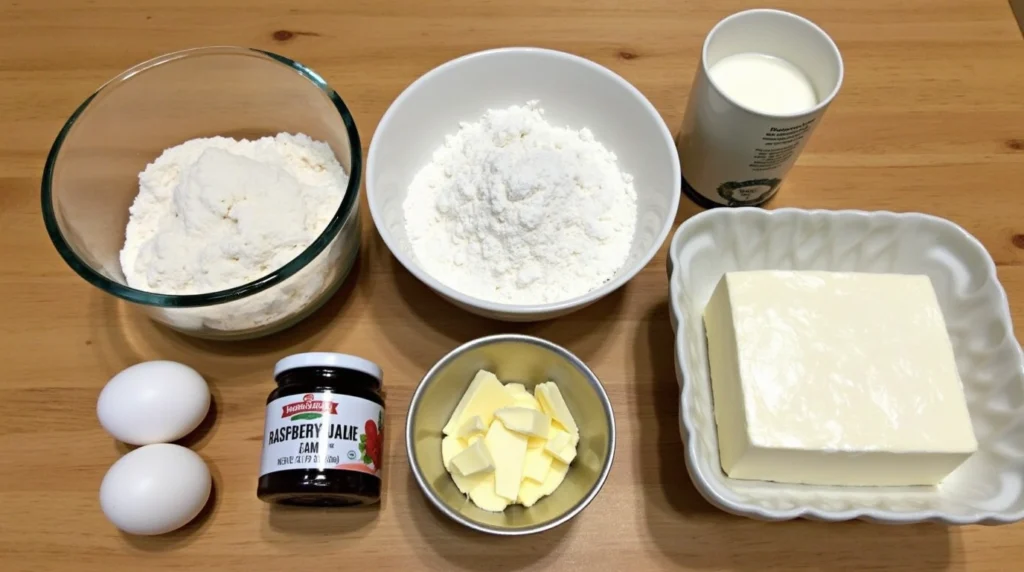
Before you start baking your princess cake, let’s gather the ingredients! The beauty of this cake lies not just in its elegant appearance, but also in the balance of flavors. Whether you want to stick to classic vanilla or get creative with fillings, these ingredients are your base for crafting a truly magical dessert. Here’s everything you’ll need:
For the Cake Layers:
- 2 ½ cups all-purpose flour – This is the backbone of your cake, creating light, fluffy layers.
- 2 ½ tsp baking powder – Ensures your cake rises perfectly.
- ½ tsp salt – A small amount of salt brings out the sweetness in the cake.
- 1 cup unsalted butter (room temperature) – Adds richness and tenderness to the cake.
- 1 ½ cups granulated sugar – Sweetens the cake to perfection.
- 4 large eggs – Helps to bind everything together and provide structure.
- 1 tsp vanilla extract – Adds a warm, comforting flavor.
- 1 cup milk – Gives the cake its moist texture.
For the Filling:
- 1 cup raspberry jam – Adds a fruity and tangy element that contrasts beautifully with the sweet buttercream.
- 2 cups heavy cream – Essential for making a fluffy and smooth whipped cream filling.
- ¼ cup powdered sugar – Sweetens the cream, ensuring it’s perfectly balanced.
For the Frosting:
- 2 cups unsalted butter (room temperature) – This will form the base of your rich and creamy buttercream.
- 4 cups powdered sugar – For that sweet, smooth consistency.
- 2 tsp vanilla extract – Enhances the flavor of your frosting.
- 2-3 tbsp heavy cream – Adjust to get the right frosting consistency.
For the Fondant:
- 1 package of white fondant – This is what gives the princess cake its smooth, royal finish. You can find pre-made fondant at most grocery stores or online.
- Gel food coloring – Optional for creating colorful accents or layers. Pink, lavender, or pastel shades work wonderfully for a princess-themed cake.
Pro Tip:
You can also experiment with the flavor of the cake by swapping out the raspberry jam for other fruit jams or even a rich chocolate ganache. For a more decadent filling, try using chocolate buttercream or vanilla custard! The key to a perfect princess cake is to make it your own while keeping the structure simple and refined.
With all your ingredients lined up, you’re ready to start crafting the perfect princess cake. Next, we’ll dive into how to make these ingredients come together in a delicious masterpiece!
Instructions for Making the Princess Cake
Now that you have all your ingredients ready, it’s time to bring the magic to life! This part is where the fun happens—layering the cake, filling it with creamy goodness, and covering it with smooth fondant. Don’t worry, I’ll guide you through every step to ensure your princess cake turns out perfect!
Step 1: Prepare the Cake Layers
- Preheat your oven to 350°F (175°C). Grease and line two 9-inch round cake pans with parchment paper.
- Mix dry ingredients: In a medium bowl, whisk together the flour, baking powder, and salt. Set aside.
- Cream the butter and sugar: In a large mixing bowl, beat together the butter and sugar until light and fluffy (about 3-5 minutes). This step is crucial for a soft, airy cake texture.
- Add the eggs: Beat in the eggs one at a time, ensuring each one is fully incorporated before adding the next. Stir in the vanilla extract.
- Combine the wet and dry ingredients: Gradually add the dry ingredients to the wet mixture, alternating with milk. Start and end with the dry ingredients, mixing until just combined. Be careful not to overmix, as this can make the cake dense.
- Bake: Pour the batter evenly into the prepared pans and bake for 25-30 minutes, or until a toothpick inserted into the center comes out clean. Allow the cakes to cool in the pans for 10 minutes, then transfer to wire racks to cool completely.
Step 2: Prepare the Filling and Frosting
- Whip the cream: In a chilled mixing bowl, beat the heavy cream and powdered sugar together until stiff peaks form. Set aside in the fridge.
- Make the buttercream: Beat the butter in a large bowl until smooth. Gradually add the powdered sugar, one cup at a time, beating until fully combined. Add vanilla extract and 2-3 tablespoons of heavy cream to achieve your desired consistency. The buttercream should be fluffy and spreadable, but not too runny.
Step 3: Assemble the Cake
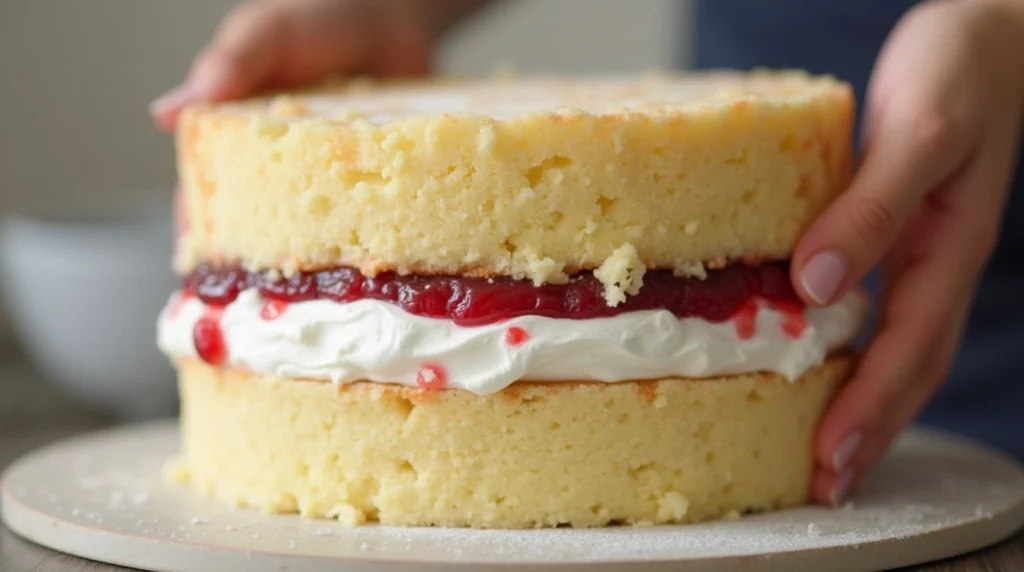
- Trim the cake layers: Once your cakes are fully cooled, use a serrated knife to level the tops if needed. This helps the layers stack evenly.
- Layer the cake: Place one cake layer on a serving platter. Spread a generous layer of raspberry jam over the top, followed by a thick layer of whipped cream. Top with the second cake layer.
- Frost the cake: Spread a thin crumb coat of buttercream around the entire cake to seal in any crumbs. Chill the cake for 30 minutes to set the crumb coat. After that, apply a smooth, even layer of buttercream over the entire cake. The buttercream should be thick and creamy for a smooth finish.
Step 4: Cover with Fondant
- Roll out the fondant: On a clean, lightly powdered surface, roll out the fondant to about ¼ inch thick. Make sure it’s large enough to cover the entire cake.
- Apply the fondant: Carefully drape the fondant over the cake, gently smoothing it out with your hands. Trim any excess fondant at the base of the cake, then use your fingers or a fondant smoother to ensure a perfect, smooth finish.
- Decorate: If you like, you can color your fondant with food coloring and create decorative accents like flowers, ribbons, or a crown. This is where you can get creative and add that magical touch to your princess cake!
Step 5: Final Touches
Once your cake is fully assembled and decorated, let it sit for 30 minutes to ensure the fondant sets properly. Then, slice it up and get ready to serve a stunning, delicious cake that will wow your guests!
Pro Tips and Variations for the Perfect Princess Cake
Now that you’ve learned how to make the basic princess cake, it’s time to take it to the next level with some pro tips and creative variations. These little touches will help you achieve a flawless cake and add your personal flair. Let’s dive into some expert advice to make your cake even more magical!
Pro Tips for a Smooth and Elegant Cake:

- Perfect Your Fondant Finish: The key to a smooth fondant application is patience. After rolling out the fondant, gently lift it using a rolling pin and drape it over your cake. If you notice any wrinkles or air bubbles, gently smooth them out with your hands or a fondant smoother. Don’t forget to trim the excess at the base for a clean, polished look.
- Crumb Coat for a Neat Finish: Don’t skip the crumb coat! Applying a thin layer of buttercream around the entire cake before frosting helps to seal in crumbs and create a smooth base for the fondant. Chill the cake for at least 30 minutes after applying the crumb coat to ensure it sets before you add the final buttercream layer.
- Chill Between Layers: If you want your princess cake to be perfectly sturdy, especially if you’re working with multiple layers and fillings, let the cake chill in the fridge between steps. It helps everything set nicely and keeps the cake from sliding around during assembly.
- Use a Sharp Knife for Cutting: When it’s time to slice your cake, use a sharp serrated knife to get clean cuts through the fondant and cake layers. A dull knife will crush the delicate layers and ruin the pristine look of your cake.
Variations to Customize Your Princess Cake:
The beauty of the princess cake is its versatility! You can experiment with different fillings, frostings, and even fondant designs to make it uniquely yours.
- Fillings: While raspberry jam is a classic choice, why not try other fruit jams like strawberry or apricot for a different twist? Or, opt for chocolate ganache or lemon curd for a richer or tangier filling. You can also use flavored buttercream, like chocolate or strawberry, to complement the cake layers.
- Flavor the Cake: If you’re feeling adventurous, change up the flavor of the cake itself! Add a hint of almond extract for a more sophisticated taste, or try a lemon-infused cake for a light and refreshing flavor. You can also incorporate a little cocoa powder to make a chocolate version of the princess cake—perfect for chocolate lovers!
- Themed Decorations: For a truly customized look, you can use gel food coloring to create pastel shades of fondant and design fun patterns like flowers, bows, or even a little crown for the princess theme. You can also use edible glitter for an extra sparkly finish.
- Mini Princess Cakes: If you’re hosting a smaller gathering or want to create individual servings, consider making mini princess cakes! Simply bake smaller rounds of cake, layer with filling, and cover with fondant for individual-sized treats that are just as delightful.
Bonus Tip: Make It Ahead
Planning ahead? The princess cake can be made a day or two in advance. After assembling the cake, wrap it tightly in plastic wrap and store it in the fridge. The fondant and frosting will stay fresh, and the flavors will even have more time to develop!
Serving Suggestions for Your Princess Cake
Once you’ve created this stunning princess cake, it’s time to serve it up and make your guests feel like royalty! Whether you’re hosting a grand celebration or a casual get-together, here are some creative ways to serve and enjoy your princess cake.
Perfect Pairings for Your Princess Cake:
- Tea Time: The light and fluffy texture of the princess cake pairs wonderfully with a hot cup of tea. Opt for a delicate herbal tea like chamomile or a fragrant Earl Grey to complement the sweetness of the cake. It’s the ideal treat for a cozy afternoon with friends or a relaxing moment to yourself.
- Coffee and Cake: For those who prefer a bit more caffeine with their cake, serve the princess cake alongside a rich espresso or a frothy cappuccino. The smooth buttercream and soft cake layers are the perfect match for the bold flavors of coffee.
- Fruit and Berries: Add a refreshing touch by serving your princess cake with fresh fruit or berries. Strawberries, raspberries, or blueberries make a vibrant, delicious contrast to the sweet richness of the cake. You can even drizzle a little fruit sauce or jam on the side for extra flavor.
- Whipped Cream: For an indulgent, yet simple addition, a dollop of freshly whipped cream can elevate your cake even further. It adds a light, airy contrast to the cake’s creamy filling and rich fondant, making each bite even more delightful.
- Ice Cream: If you’re looking to make the dessert even more special, consider pairing the princess cake with a scoop of vanilla ice cream or a fun flavor like raspberry sorbet. The cold and creamy texture of the ice cream balances beautifully with the richness of the cake.
Creative Presentation Ideas:

- Decorative Cake Stands: Presenting your princess cake on a decorative cake stand will elevate the overall look of your dessert. Opt for a classic silver or gold stand to add a touch of elegance, or use a whimsical pastel-colored stand to complement the theme of your cake.
- Individual Servings: For smaller gatherings, consider serving individual portions of princess cake. You can cut the cake into smaller slices or create mini princess cakes, allowing each guest to enjoy their own little piece of magic.
- Themed Decor: If you’re serving the cake at a themed party, such as a princess or fairy tale gathering, add themed decorations to the table. Think fairy lights, pastel-colored tablecloths, or even small figurines that tie into the princess theme.
Ideal Occasions for Serving Princess Cake:
- Birthdays: A princess cake is always a hit at birthday parties, especially for those who love a little whimsy and magic. Whether it’s for children or adults, this cake brings the celebration to life.
- Weddings: A more elegant take on the princess cake can be an enchanting addition to a wedding reception. You can decorate it in elegant colors like white and gold, and add floral accents to fit the wedding theme.
- Tea Parties: Whether it’s a formal tea or an afternoon get-together, the princess cake is a perfect dessert for these occasions. Its delicate layers and light sweetness make it a fitting choice for a sophisticated yet fun gathering.
- Special Celebrations: From anniversaries to baby showers, the princess cake adds a magical touch to any celebration. Customize the cake’s decorations and flavors to suit the occasion for a truly unforgettable dessert.
Conclusion: Why Your Princess Cake Will Steal the Show
After all the steps, tips, and tricks you’ve learned, there’s no doubt that your princess cake will be the star of any celebration. From its soft and delicate cake layers to its rich raspberry jam filling and smooth fondant covering, this cake brings both elegance and deliciousness to the table. Whether you’re making it for a birthday, tea party, or just because, it’s a showstopper in both flavor and appearance.
Why You’ll Love Making This Cake:
- Customizable: The beauty of this princess cake is its versatility. You can play with different flavors, fillings, and decorations to suit any theme or personal taste. Whether you’re going for a classic flavor or a bold twist, the options are endless!
- Elegant yet Simple: Despite its showstopping look, the princess cake is simple to make with the right techniques. With a few expert tips, you’ll be able to create a cake that looks like it came from a bakery, but with that homemade charm.
- A Memorable Experience: This cake isn’t just a dessert—it’s an experience. The joy of making it, decorating it, and, of course, sharing it with loved ones is something special. It creates lasting memories that will have everyone talking long after the last slice is gone.
The Perfect Addition to Any Celebration
The princess cake works for so many occasions, whether it’s a magical birthday, a wedding, a holiday, or just a moment of joy to celebrate life. With its sweet flavor, gorgeous presentation, and royal appeal, it’s sure to make your event extra memorable.
Whether you’re a seasoned baker or a novice, this cake is approachable and fun to make. I hope you’ve enjoyed learning how to create this delightful treat and are now ready to bring a little magic to your kitchen. Happy baking, and enjoy your slice of princess cake!
FAQs: Your Princess Cake Questions Answered
I’m sure you’re excited to bake your princess cake, but I bet you might have a few questions along the way. Don’t worry—I’ve got you covered! Here are some frequently asked questions to help guide you through the process and ensure your cake turns out perfect every time.
1. Can I make the princess cake in advance?
Yes, absolutely! In fact, this cake is perfect for making ahead. Once assembled, you can store the cake in the fridge for up to two days. Just be sure to wrap it tightly in plastic wrap to keep the fondant fresh. You can also bake the cake layers a day ahead and freeze them, then assemble the cake the day before your celebration.
2. Can I use store-bought fondant instead of making my own?
Definitely! Store-bought fondant is a convenient option and can save you a lot of time. Brands like Wilton or Satin Ice offer high-quality fondant that’s easy to work with. Just make sure to roll it out evenly and store any leftovers properly to prevent it from drying out.
3. What if I don’t like raspberry jam?
Not a problem! The princess cake’s filling is entirely customizable. You can substitute the raspberry jam with any other fruit preserve you prefer, like strawberry, apricot, or even a tangy lemon curd. If you’re a chocolate lover, a rich chocolate ganache or buttercream filling would work wonderfully too.
4. How do I prevent the fondant from cracking?
Fondant can be a bit tricky, but with a little care, you can achieve a smooth finish. Make sure your cake is well chilled before applying the fondant. This helps it hold its shape and prevents cracks. Also, try not to roll the fondant too thin. If the fondant starts cracking, lightly smooth it with your hands or use a fondant smoother to blend the edges.
5. Can I make a gluten-free or dairy-free version of this cake?
Yes! You can certainly make a gluten-free version of the princess cake by swapping regular flour for a high-quality gluten-free flour blend. For a dairy-free version, substitute the butter with a dairy-free alternative like vegan butter, and use almond milk or coconut milk instead of regular milk. Just be sure to double-check the ingredients in your fondant if you’re going dairy-free.
6. How do I store leftovers?
To store any leftover princess cake, wrap it tightly in plastic wrap and place it in an airtight container. It will stay fresh for about 2-3 days at room temperature, or you can refrigerate it for up to a week. If you want to keep it longer, you can freeze individual slices for up to 3 months. Just make sure to wrap it well in plastic wrap and aluminum foil before freezing.
7. Can I decorate the princess cake with different designs?
Of course! The princess cake is a blank canvas for your creativity. You can add floral decorations, edible glitter, or themed elements like fondant crowns, bows, or stars to give it a personal touch. You can even tint the fondant to match the colors of the party or celebration theme. The possibilities are endless, so don’t be afraid to get creative!
8. How do I cut the cake neatly?
When cutting a fondant-covered cake, it’s important to use a sharp, serrated knife. Start by cutting gently through the fondant, and then continue to cut through the layers of cake. For clean slices, dip your knife in hot water and wipe it clean between cuts. This will help maintain the sharpness of the slice and avoid squishing the cake layers.
Princess Cake
Ingredients
- 2 ½ cups all-purpose flour
- 2 ½ tsp baking powder
- ½ tsp salt
- 1 cup unsalted butter room temperature
- 1 ½ cups granulated sugar
- 4 large eggs
- 1 tsp vanilla extract
- 1 cup milk
- 1 cup raspberry jam
- 2 cups heavy cream
- ¼ cup powdered sugar
- 2 cups unsalted butter for frosting
- 4 cups powdered sugar for frosting
- 2 tsp vanilla extract for frosting
- 2-3 tbsp heavy cream for frosting
- 1 package of white fondant
- Gel food coloring optional for decorating
Instructions
- Prepare the Cake Layers: Preheat oven to 350°F (175°C). Grease and line two 9-inch round cake pans.
- Mix Dry Ingredients: Whisk together flour, baking powder, and salt. Set aside.
- Cream Butter and Sugar: Beat butter and sugar until fluffy. Add eggs one at a time, then mix in vanilla.
- Combine Wet and Dry Ingredients: Gradually alternate adding dry ingredients and milk. Mix until just combined.
- Bake the Cake: Pour batter into pans and bake for 25-30 minutes or until a toothpick comes out clean. Let cool.
- Prepare the Filling and Frosting: Whip cream with powdered sugar until stiff peaks form. Make buttercream by beating butter and powdered sugar, then add vanilla and heavy cream.
- Assemble the Cake: Layer the cake with raspberry jam and whipped cream. Frost with a crumb coat, chill, then apply a smooth layer of buttercream.
- Cover with Fondant: Roll out fondant and cover the cake. Smooth with hands or a fondant smoother, trim excess.
- Decorate and Serve: Add any additional decorations like colored fondant or edible glitter.
Notes
- Customize the filling with different jams or a rich chocolate ganache for variations.
- The cake layers can be made a day in advance and stored in the fridge.